
Scenes are between top and bottom bars
Book Contents Previous Chapter Next Chapter
This chapter describes scenes, viewable objects that contain virtually all the other viewables in the space between the name bar at the top of the screen and the control bar at the bottom of the screen. If your package displays its viewables, it will probably contain at least one scene.

Scenes are between top and bottom bars
A scene provides the setting for the viewables you put on the screen. If your package presents more than one setting filled with viewables, you may want to include multiple scenes. For example, the notebook includes two scenes: one scene is used when displaying a page in the notebook, and another is used when showing the notebook index. As the user switches from one notebook page to another, the notebook simply installs different pages in the notebook scene.
Scenes specify a collection of viewables that you want your package to display on the screen all at once. You probably won't ever have to make a scene at runtime. Instead, you'll specify your scenes and their contents when you build your package.
When Magic Cap opens windows on the screen, the windows are not installed as subviews in the scene. Instead, windows are always subviews of the screen object. This allows windows to "float" above viewables in the scene, making windows always appear in front of the scene.
Navigation features provided by scenes allow users to look through the information in a scene and to move from one scene to another. You can create scenes that display an unchanging set of viewables, or a variety of different settings depending on user actions.
Scenes can add custom items to various system locations, such as the Magic Lamp, tools window, and stamper. Scenes can also customize the options that appear when the user touches one of the system-provided commands in the Magic Lamp, such as mail or fax.
Each scene has flags that you can use to set up specialized behavior. Magic Cap defines various indexicals for built-in scenes and other important scene-related objects, and several items in the package root list provide scene-related features.
As users work with Magic Cap, they use navigation to move from one scene to another. Magic Cap's user interface provides various techniques for navigation. The name of a step-back scene appears in the upper-right corner of the screen next to the picture of a pointing hand. The user can touch there to go to the step-back scene.

The hand points to the name of the step-back scene
When the user moves to a new scene, the new scene determines what its step-back scene should be. Often, the user moves to a new scene by logically "zooming in" for a closer, more detailed view. In cases like this, the new scene sets the "zoomed out" scene as the step-back scene. For example, the datebook sets the desk as its step-back scene because the datebook is a zoomed-in, detailed view of an item on the desk. Similarly, the desk sets the hallway as its step-back scene, because the desk is a zoomed-in, detailed view of an item in the hallway.
In other cases, the step-back scene is simply the previous scene. For example, the user can option-touch the Magic Lamp to move directly to the controls in the hallway. In this case, the previous scene becomes the step-back scene. In some cases, the step-back scene is chosen by other criteria. The downtown scene has no enclosing scene, so its step-back scene is arbitrarily chosen to be the hallway.
Some scenes have step-back scenes that never change. For example, the desk always has the hallway as its step-back scene, and the hallway always has downtown as its step-back scene. Such scenes are called places. You can call IsPlace to determine if a scene is a place. Some scenes can scroll horizontally, such as the hallway and downtown. These scenes are corridors. You can call IsCorridor to determine if a scene is a corridor.
Scenes have a StepBackScene attribute that determines the scene that appears next to the pointing hand. If your package's scene isn't a place and the user goes to your scene, Magic Cap sets the step-back scene to the scene the user came from. If your scene is a place, Magic Cap leaves the step-back scene unchanged when the user goes to your scene. You can use the StepBackScene attribute to get and set this value.
If the user steps back, Magic Cap calls the scene's StepBack operation, which moves to the step-back scene. If the scene's StepBackSpot attribute isn't nil, a zooming-out effect is drawn focused on the StepBackSpot.
Every scene displays its name in the upper-left corner of the screen. You can override the scene's PlaceName operation if you want the name displayed in the upper-left corner of the screen to be something other than simply the name of the scene.
As the user moves from scene to scene, Magic Cap keeps track of the scenes visited most recently. If the user option-taps the name of the step-back scene, a list of these scenes appears. The user can then touch a name to go directly to a scene on the list.

The list of recently visited scenes
When the user moves to a new scene, Magic Cap provides an animated visual effect that suggests zooming in to a closer view or zooming out to a wider view if that effect is appropriate. For example, when the user touches the phone on the desk, a zooming-in effect suggests that the phone is filling the screen. If the user steps back to the desk, a zooming-out effect suggests the phone scene shrinking to fit back on the desk as the user's attention widens to the entire desk.
You can go to any scene by calling GoTo. If you want the new scene to remember where the user came from before moving, call GoToVia. The new scene's step back spot will be set to the viewable you pass when calling GoToVia. You can override GoTo and GoToVia to customize their behavior. These operations are called whenever the user moves from your scene to another, so you can override them to perform some custom behavior whenever the user leaves your scene.
Every scene can have an associated window that provides helpful information about how to work the scene's features. If the scene has an information window, Magic Cap draws a circled question mark at the left edge of the screen's name bar. The user can touch there to display the information window.
Scenes specify their information windows by listing them in the package root list. For more information on items in the root list, see the Software Packages chapter of this book.
Titled windows can have their own information windows. For more information, see the Windows chapter of this book.
The current scene is the scene being displayed on the screen. The current scene contains all the other viewables between the top and bottom bars, except windows. You can determine the current scene by reading the iCurrentScene indexical. When a scene becomes current, Magic Cap sets iCurrentScene to the new scene, then calls the scene's OpenScene operation. You can override OpenScene to have your scene perform some action when it becomes current. Similarly, you can override CloseScene to perform some special action when your scene is no longer current.
When the communicator is about to shut off, Magic Cap calls the current scene's ShutdownScene operation. You can override ShutdownScene to perform some action before power is shut off. However, if your scene isn't current, or an unexpected power loss occurs, your scene's ShutdownScene operation won't be called.
Some scenes, such as the controls scene, display a fixed set of viewables. However, many scenes vary their display depending on the user's actions. One of the most common ways to organize these variable displays within a scene is by containing viewables in cards, viewables which fill most of the scene's screen area. For example, each page in the notebook is a card. When the user looks at a page in the notebook, the card that represents that page becomes a subview of the notebook scene.
Often, many cards in a scene share some information. Magic Cap uses forms for the information that can be shared among cards. In some scenes, all the cards are collected together into a list called a stack of cards, also called a stack. For example, the notebook has one form for each of its stationery types, and all the cards in the notebook are part of a single stack of cards. Most scenes that display a stack of cards are members of class StackScene, a subclass of Scene. See the Cards, Stacks, and Forms chapter of this book for more information on this subject.
If you're using a stack scene, you can get the card being displayed by calling CurrentCard or by reading iCurrentCard. You can get the scene's stack by calling Stack.
If you're using a stack scene, you can call various operations to display cards in the stack. You can display any card by calling SetCurrentCard. If the card isn't already in the stack, SetCurrentCard adds it. You can also call GoToNext or GoToPrevious to display the next or previous card in the stack, or GoRelative to move a specified number of cards forward or backward in the stack.
Class Scene defines CurrentCard, Stack, GoToNext, GoToPrevious, and GoRelative, but their implementations are empty, left to be defined by subclasses like StackScene. You can also create your own subclass of Scene that implements these operations however you wish. For example, you might create a subclass of Scene that uses something other than cards to contain its viewables. Such a subclass could use GoToNext, GoToPrevious, and GoRelative to move through the scene in the same way that stack scenes move from one card to another. For example, class DatebookScene overrides GoRelative to move through days, months, and years.
When a scene becomes current, it can install its own commands, rules, and other objects in various system locations. These objects are called scene additions. Magic Cap provides support for the following kinds of scene additions:
-------------------------------------------------------
kind of addition            where installed
-------------------------------------------------------
commands (usually buttons)  commands area in Magic Lamp
rules                       rules window in Magic Lamp
tools                       tools window
stamps (one drawer)         bottom drawer of stamper
bank of drawers of stamps   stamper
-------------------------------------------------------
Magic Cap contains examples of all these kinds of additions. Many scenes add commands, such as the clear and summary commands added by the in box scene. Many scenes add rules. For example, the clock scene adds a rule that allows the user to get the time and date from the AT&T PersonaLink clock. Various built-in scenes, including the notebook, provide an example of added tools: they install the arranging tools. The datebook demonstrates adding a drawer of stamps: its stamps provide images for common kinds of appointments. The name cards scene add an entire bank of drawers, five drawers that provide labels for addresses and phone numbers.
A scene can choose to add different commands, rules, and tools depending on whether construction mode is on. For example, the storeroom scene adds the clean up memory command only if construction mode is on, but it adds the back up and restore commands no matter what the construction mode setting.
To specify scene additions, include an object of class SceneAdditions in your instance definition file and set the scene object's sceneAdditions field to refer to it. If your scene has no additions, just set this field to nilObject.
The fields of the scene additions object specify the items to be added when the scene is current; if any of its fields are not nil, Magic Cap will automatically install the scene's additions when the scene becomes current.
The commands field of the scene additions object refers to an object list with two items. These items are object lists themselves: the first object list contains the viewables that should be displayed in the commands area if construction mode is off, and the second has the viewables to be displayed if construction mode is on. This relationship is shown in the following diagram:
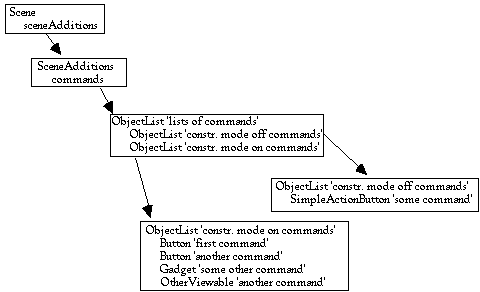
Command additions for a scene
When a scene adds viewables to the commands area of the Magic Lamp, Magic Cap automatically lays out the viewables in the window. The location of the viewables specified by their relative origins is ignored.
In the same way, the rules field of the scene additions object refers to an object list with two items. These items are objects lists themselves: the first contains the rules to be displayed with construction mode off, and the second lists the rules to be shown with construction mode on.
Often, you'll want the same commands and rules to appear regardless of whether construction mode is turned on. If you do this, you don't have to declare two identical object lists of commands or rules. Simply set both entries of the main object list to refer to the same list of commands or rules.
As with commands and rules, the tools field contains an object list with two items, one to be used with construction mode off and the other when construction mode is on. However, these object lists don't contain object lists themselves. Instead, they contain a single viewable object that will be installed in the tool window when the scene is current. To have your tools accompany a scene, declare a box that contains your tools as subviews, then make the tools object list refer to that box. This relationship is shown in the following diagram.
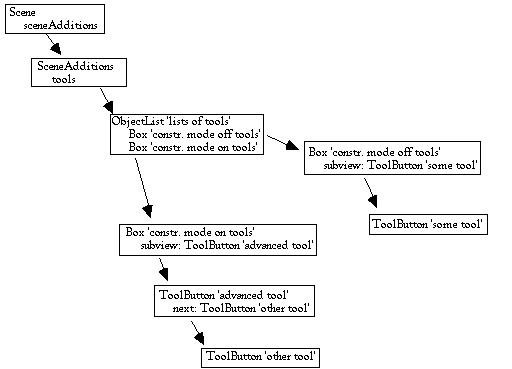
Tool additions for a scene
When a scene adds tool buttons in a box, Magic Cap installs the box as a subview in the tools window just as its relative origin specifies in the instance definition file. The tool buttons themselves inside the box also appear according to their relative origins. Magic Cap doesn't attempt any automatic layout.
As with commands and rules, you may want the same tools to appear regardless of whether construction mode is turned on. If you do this, you don't have to declare two identical boxes and tool buttons. Simply set both entries of the main object list to refer to the same box containing tool buttons.
Your scene can add specialized stamps to Magic Cap in either or both of these ways:
If your scene adds its own stamps, the scene additions object's stamps field refers to the first viewable object, usually a stamp, in a view chain of objects that will appear in the bottom drawer. The name of the drawer is set to the name of the scene object. Unlike commands, rules, and tools, there's no way to vary the selection of stamps according to the construction mode setting.
The relationship among the pertinent objects is shown in the following diagram:
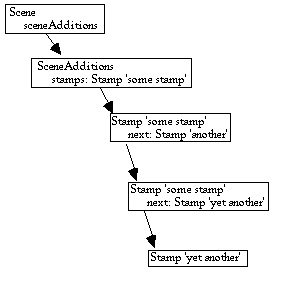
Stamp additions for a scene
If the scene adds its own bank of drawers, the scene addition object's stampBankNames field refers to a text object that contains the names of the added drawers, separated by the carriage return character (ASCII 0x0D). The number of drawers is determined by the number of names in the text object. Because of the limited area on the screen for the stamp drawers, you should have no more than 5 drawers in your bank.
NOTE: To specify a carriage return character in your instance definition files, you can use a backslash followed by n. For example, ObjectMaker translates the following string in an instance definition file to the ASCII strings one and two, separated by a carriage return:
'one\ntwo'
The entire expression is enclosed in single quotation marks, which is ObjectMaker's standard syntax for ASCII text.
The scene addition object's stampBankContents field refers to an object list. This object list contains one entry for each drawer in the bank. Each entry in this object list refers to the first viewable object, usually a stamp, in a view chain of objects that will appear in a drawer. The name of the bank of stamps is set to the name of the object list. Unlike commands, rules, and tools, there's no way to vary the selection of stamps according to the construction mode setting. The relationship among these objects is shown in the following diagram:
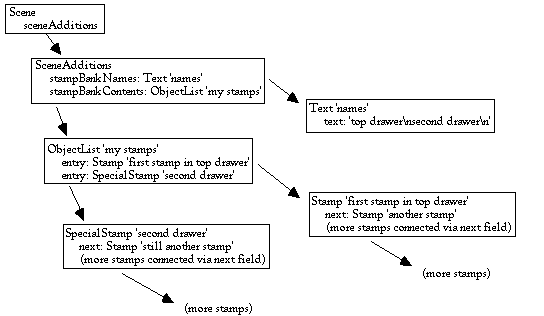
Stamp bank addition for a scene
When a scene adds its own stamps, Magic Cap installs the stamps as subviews in the drawer at the positions specified by their relative origins in the instance definition file. Magic Cap doesn't attempt any automatic layout of the stamps.
When you declare a scene in your instance definition files, you can use the scene's sceneFlags field to indicate which drawer should open when the user first opens the stamper while in your scene. You can specify the general drawer of the main bank, the bottom (custom) drawer of the main bank, or the top drawer of the scene's custom bank.
Class Scene defines attributes for Additions, Commands, Rules, Tools, Stamps, StampBankNames, and StampBankContents. However, you'll probably never use any of these directly. By specifying your scene additions in the instance definition file, Magic Cap will install and remove them automatically.
Many scenes, especially stack scenes, display a column of five buttons along the right side of the screen, between the top and bottom bars. Although many scenes have these buttons, Magic Cap doesn't provide any explicit support for this feature in its scene classes. Instead, scenes simply declare these buttons as subviews in instance definition files. For more information about setting up buttons like this, see the Stacks and Stack Scenes section of this book's Cards, Stacks, and Forms chapter.
The Magic Lamp includes buttons, available in every scene, that let the user perform various sending, imaging, and filing operations on the scene's contents. Specifically, the following buttons are available in the Magic Lamp:
--------------------------------------------------------------------------------
command button  function
--------------------------------------------------------------------------------
file            put objects or copies into a package or file cabinet
print           print objects to attached printer or via linked computer
mail            put objects on new telecard
fax             send images of objects via fax
beam            send objects via infrared beam to another Magic Cap communicator
--------------------------------------------------------------------------------
When the user touches one of these buttons, Magic Cap displays a window that includes a choice box listing the sets of objects that can be used when performing the command. This choice box is sometimes called the "what" box because it lists what can be sent, imaged, or filed.
The choices offered depend on the current scene. For example, touching print may offer the choice of printing the screen, the current card, or all the cards in the current scene. The following figure shows the File window and its choices when the user touches the file button while looking at the General Magic name card.
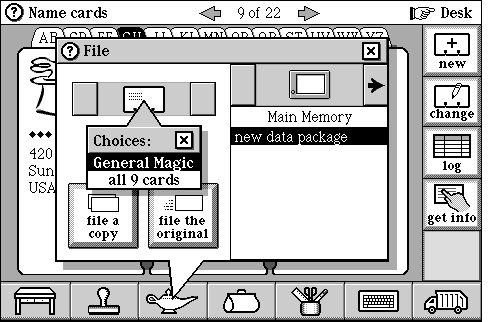
Choices for what to file
Magic Cap supports these command buttons by using content proxies, place holder objects that refer to the objects being sent, imaged, or filed. When the user touches one of the buttons listed above, Magic Cap asks the current scene for a list of the sets of objects that should be presented in the choice box. Each choice is represented by a content proxy. For example, the preceding figure shows two content proxies, one for the current name card and one for all the cards in the name card file. Magic Cap uses the content proxy to get the necessary information for performing the command.
When the user touches one of the command buttons, Magic Cap calls the scene's MakeContentProxyChoices operation to ask what sets of objects to list in the "what" choice box. Your scene can control what appears in the "what" box by overriding MakeContentProxyChoices. Magic Cap passes a parameter to MakeContentProxyChoices that indicates which button the user touched. This allows MakeContentProxyChoices to vary its response according to the action the user is performing.
When Magic Cap calls MakeContentProxyChoices, it passes as a parameter the list object that contains the "what" choices. To add to the choices, your scene should call NewContentProxy for each new choice, then call ObjectList_AddLast to add the new content proxy to the list. The calls to NewContentProxy and AddLast are typically combined in a single line, as in the following example:
AddLast(list, NewContentProxy(self, nilObject, 1, CurrentCard(self), iPrintImage, nil));
The parameters to NewContentProxy provide the following information:
For the imaging commands (print and fax), the object for which you create a proxy should be a viewable that contains all the objects to be imaged. To perform the command, Magic Cap will first make the connection to the printer or fax machine, then call Viewable_Draw for the container and all its contents.
For the sending commands (mail and beam), the object for which you create a proxy should be a member of class Card or an object list of cards. To perform the command, Magic Cap creates a new, blank telecard, then places a copy of the objects to be sent on the telecard, using an image supplied by the content proxy. Typically, all the objects will be on the current card, so you can call NewContentProxy to make a proxy for the current card, as in the example above. Magic Cap sends a copy of the original object, along with copies of objects that it refers to in its fields, except objects declared as noSend in the class's definition.
You can also send objects that aren't contained on cards, although you must do considerably more work. When Magic Cap prepares to send, it calls the content proxy's MailOnTelecard operation to create the telecard. MailOnTelecard in turn calls the CreateContainer operation of the object to be sent. CreateContainer copies the objects and places them on the telecard. To send objects that aren't cards, you should create a subclass of ContentProxy and override MailOnTelecard and CreateContainer. For example, the datebook uses this approach in order to send tasks with the mail and beam commands.
For filing, the object for which you create a proxy must be a member of class Card or an object list of cards. You can't file objects that aren't cards, although the cards can contain any other objects. When the card is filed with the file the original button, Magic Cap files the object along with copies of objects that it refers to in its fields, except objects declared as noSend in the class's definition.
When the card is filed with the file a copy button, Magic Cap files a copy of the original object, along with copies of objects that it refers to in its fields, except objects declared as noSend in the class's definition.
The package root list includes several items related to scenes. Item 6 in the root list (iPackageStandardPlaces) is an object list that specifies all scenes in the package, and the first item in this object list (iPackageStartupScene) is the scene that appears when the user first goes to the package. Item 9 (iPackageObjectsWithHelp) lists the scenes and windows in the package that have information windows, with their corresponding information in item 10 (iPackageHelpOnObjects). Item 18 (iPackageCreditsScene) specifies a scene that shows author and publisher credits for the package. The user can see this scene by touching the credits button in the package's storage box in the storeroom.
The package root list lets you create a way for the user to get to scenes in your package, such as a door in the hallway. To do this, include scenes in the install list (root list item 3) and corresponding locations in the receiver list (root list item 4). For complete information on items in the root list, see the Software Packages chapter of this book.
Magic Cap provides various scene subclasses that you can use in your packages. The most important is class StackScene, the subclass used for displaying a stack of cards, such as the name cards. Another useful subclass is IndexScene, which inherits from class HasContentList. Objects of this class are scenes that can show individual list elements or can show an index (a content list view) that summarizes all the elements in the list.
Class ModalScene is used for scenes that contain several screens of information, like stacks, but have little in common among the screens. Magic Cap's phone is an example of a modal scene. The various modes of a modal scene are usually implemented by having a card for each mode.
The name card file uses the NameCardsScene subclass of StackScene to display its cards.
Class Scene defines various flags that you can use to customize the appearance and behavior of its members. You'll use these flags primarily when you declare scenes in instance definition files. Most flags that are commonly tested at runtime are available via operations. Others must be examined directly in the scene object's sceneFlags field.
Scene flags enable various features, including customizing the display at the top of the screen when your scene is current, instructing the find command to skip your scene when the user searches for something, and preventing the time and date from appearing in the name bar. There are other scene flags that provide more customization. For more information on scene flags, see the Scene chapter of Magic Cap Class and Method Reference and the Utilities.h file.
Magic Cap keeps track of the current drawing tool, the tool most recently used to draw or write. Scenes that often use drawing tools, such as the messages scene and the notebook scene, can set a flag that causes Magic Cap to choose the current drawing tool whenever the scene becomes current. You can call DefaultTool to determine the tool, if any, that will be set when the scene becomes current. You can also check iLastDrawingTool to determine the current drawing tool.
Magic Cap provides indexicals that contain useful scenes or information about scenes. Indexical iSystemScenes is a list containing many of Magic Cap's built-in scenes, such as the desk, hallway, downtown, name cards, datebook, and so on. You can use the GoTo operation and an indexical from iSystemScenes to take the user to a well-known scene. See Magic Cap Class and Method Reference and the Indexicals.h file for more about indexicals.
For more information, see these topics in Magic Cap Class and Method Reference:
class Scene
operations and attributes:
Additions
CloseScene
Commands
CurrentCard
DefaultTool
GoRelative
GoTo
GoToNext
GoToPrevious
GoToVia
IsCorridor
IsPlace
MakeContentProxyChoices
NewContentProxy
OpenScene
PlaceName
Rules
SetCurrentCard
ShutdownScene
Stack
StampBankContents
StampBankNames
Stamps
StepBack
StepBackScene
StepBackSpot
Tools
fields:
sceneAdditions
class StackScene
operations and attributes:
CurrentCard
GoRelative
GoToNext

SetCurrentCard
Stack
class IndexScene
class SceneAdditions
fields:
commands
rules
stampBankContents
stampBankNames
stamps
tools
class ContentProxy
operations and attributes:
CreateContainer
MailOnTelecard
indexicals:
iCurrentScene
iLastDrawingTool
iSystemScenes
Book Contents Previous Chapter Next Chapter