Starting a lesson
Book Contents Previous Chapter Next Chapter
This chapter describes how to make lessons that train users to perform tasks in Magic Cap. The information in this chapter is useful if you want to create lessons to teach skills that users will need while using your package. Before reading this chapter, you should be familiar with viewables, cards, and buttons.
Magic Cap provides lessons as a way to train users by leading them through new tasks while providing instructive information and feedback. Magic Cap includes its own built-in lessons, which the user sees by touching the Getting Started button when Magic Cap first starts up or by opening the Getting Started book in the library. The lessons provided by Magic Cap help the user through such important actions as personalizing the communicator, setting the time and date, and registering for an electronic mail service.

Starting a lesson
You can include lessons in your package if you want to teach users how to perform common tasks or lead them through important setup actions, such as registering for a service. You'll create lessons mostly by declaring appropriate objects in your instance definition files. In addition, you may create Magic Scripts for some lesson operations. You're not likely to create your own lesson subclasses.
Generally, users start a lesson by touching a lesson button, such as the set time & date button pictured above. Lesson buttons, including the one above, are often placed on lesson cards. When the user touches a lesson button, the lesson begins by showing the first lesson step, a single instruction in the lesson, in a lesson window. The lesson step usually indicates which viewable to touch in order to continue the lesson. If the user touches somewhere else, Magic Cap makes an error sound and blinks the screen at the right place.
A lesson step list refers to all the steps in a lesson. When a lesson is active, Magic Cap sets the current tool to the lesson tool, a special tool that constrains the user's touch to a desired viewable.
When you create your own lesson, you'll specify the steps that make up the lesson and a step list that refers to all the steps. In addition, you'll probably create a lesson button that the user can touch to start the lesson, and a lesson card to hold the button and some explanatory text. You probably won't create your own lesson window or lesson tool. Instead, you'll use the windows and tool provided by Magic Cap.
The rest of this section describes the various classes of lesson objects and how you can create your own lessons using objects of these classes.
When you create a lesson, you'll declare an object of class LessonStep for every instruction in the lesson. Each lesson step includes information about the step in its fields. The stepTarget field contains the viewable that the user must touch in order to proceed to the next step. If you want the user to touch a screen area or any of a group of viewables, you can use the stepTargetBox field to describe the touch area.
You can use the stepWindowDot field to indicate where to place the step window. You should use global coordinates to specify the dot in this field. The stepText field contains the text that appears in the lesson window for this step.
The step's window includes a spout that points to the target. Usually, the spout points to the step target's origin, but you can customize where it points by using the stepBalloonDot field. You should use global coordinates to specify the dot in this field. This field is ignored if the kStepPointToTargetOrigin step flag is set, as described below.
The stepFlags field contains various flags that determine the step's appearance and behavior. There are many flags, providing wide flexibility in customizing the step. Magic Cap defines these flags as follows:
#define kStepHasBalloonSpout			0x00000001
	/* if set, step shows balloon spout */
#define kStepAvoidTargetObject			0x00000002
	/* set this to keep step window away from target  */
#define kStepPointToTargetOrigin		0x00000004
	/* if set, spout appears at target's origin */

#define kStepAdvanceOnTargetTouch		0x00000010
	/* if set, don't show next button in window;
		go to next step when user touches target */
#define kStepAdvanceOnTargetBoxTouch		0x00000020
	/* if set, don't show next button in window;
		go to next step when user touches target box */
#define kStepConstrainToTarget			0x00000040
	/* if set, force user to touch target */
#define kStepConstrainToTargetBox		0x00000080
	/* if set, force user to touch target box */

#define kStepGoToTarget				0x00000100
	/* if set, calls GoTo(target) on acceptable touch */
#define kStepDontPassTouchToTarget		0x00000200
	/* if set, don't pass touch to target */
#define kStepForceTouchToTap			0x00000400
	/* if set, pass Tap to target instead of Touch */
#define kStepGoToLessonScene			0x00000800
	/* if set, call GoTo on lesson's scene on touch */

#define kStepWindowKind				0x0000F000
	/* selects shape of window; see below for more */

#define kStepBlinkTarget			0x00010000
	/* if set, blink the target on bad touches */
#define kStepBlinkTargetBox			0x00020000
	/* if set, blink the target box on bad touches */
#define kStepBlinkNextButton			0x00040000
	/* if set, blink the window's next button */
#define kStepDontHideImmediately		0x00080000
	/* if set, keep lesson window open until
		next step appears */

#define kStepSuspendNext			0x00100000
	/* if set, suspend lesson when user touches next ;
		resume lesson after Magic Cap calls NextStep */
#define kStepAlwaysConfirm			0x00200000
	/* if set, show confirmation dialog on last step */
#define kStepSubviewsOK				0x00400000
	/* if set, touching a subview of target is OK */
#define kStepSomeoneElseAdvances		0x00800000
	/* if set, don't advance until Magic Cap calls NextStep */

#define kStepNoStopSign				0x01000000
	/* if set, don't show stop sign on this step's window */
#define kStepForceNormalUserLevel		0x02000000
	/* if set, turn off construction mode */
#define kStepForceSimpleKeyboard		0x04000000
	/* if set, show basic keyboard */
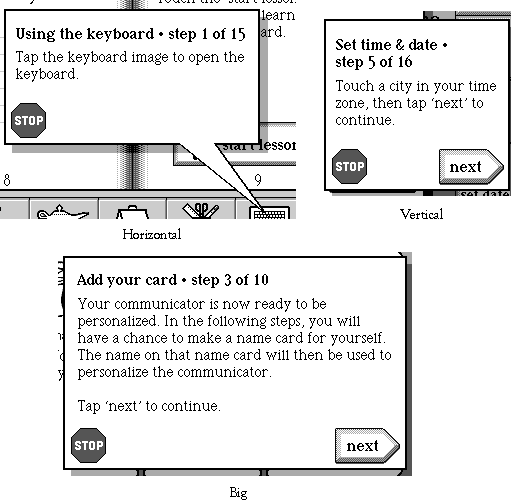
The kStepWindowKind flag determines the shape of the window used for the step. Magic Cap provides three window shapes to choose from, as shown in the following figure:

You can specify the appropriate kind of window for the step by using the following values for the kStepWindowKind flag:
#define kWindowKind_Horizontal	0	/* wide and short */
#define kWindowKind_Vertical	1	/* narrow and tall */
#define kWindowKind_Big		2	/* covers most of scene */
When you make a lesson, you'll declare an object of class LessonStepList. The lesson step list is an object list that refers to all the steps in the lesson. The lesson step list also includes a lessonScene field that is used if you set a lesson step's kStepGoToLessonScene flag. See the description of lesson flags above for more information.
The lesson step list also includes a Completed attribute. You can use this attribute to get or set whether the lesson has ever been completed. Magic Cap uses the Completed attribute to determine what text to display in lesson buttons and lesson cards, as described in the Lesson Buttons and Lesson Cards sections below.
When you make a lesson, you'll probably create one or more objects of class LessonButton to provide a way for users to start the lesson. Lesson buttons refer to a lesson step list in their lesson field. When the user touches a lesson button, Magic Cap starts the lesson by going to its first step.

Lesson button
Usually, lessons start right away without going to a different scene. If you want to go to a particular scene before starting the lesson, you can set the lesson button's leapTo field to the desired scene. If the leapTo field is not nilObject, Magic Cap will go to its object after the user touches the button.
Lesson buttons usually contain a dance-class footprint image, as shown in the preceding figure. You can make this image appear on your lesson button by setting its image field to {6,375}. You must use the numeric designation - Magic Cap does not provide a name for this indexical.
Lesson buttons often appear on lesson cards, as described in the following section.
You should collect related lessons together in a book. For example, Magic Cap's Getting Started book contains a set of lessons that show new users how to perform various tasks. If you create a book of lessons, you can use objects of class LessonCard for each page instead of BookPage objects.

Lesson card in its scene
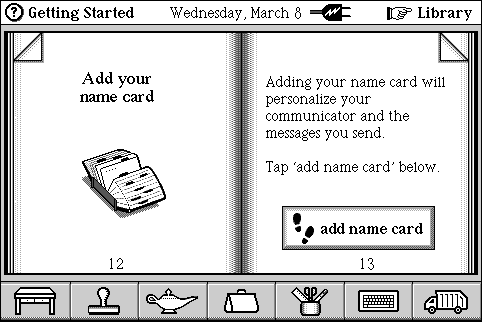
Lesson cards provide a convenient and flexible framework for lessons. Lesson cards include a lessonButton field that refers to the lesson button on the card. The lessonField field refers to a text field subview of the card that is used to provide information about the lesson. The normalText field contains the text of the lesson field. For example, in the preceding figure, the lesson field contains the normal text, which reads Adding your name card will personalize your communicator and the messages you send. Tap `add your name card' below. When the lesson card appears on the screen, Magic Cap automatically places the normal text into the lesson field.
Lesson buttons are often labeled start lesson, then renamed repeat lesson after the user has completed the lesson. If you want to change the name of the button after the user completes the lesson, you can specify the alternate text in the button's repeatName field.
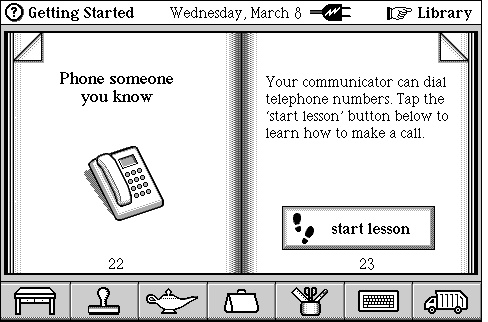
Lesson cards help you create lessons that can be used only under some conditions or if the user has completed certain prerequisites. For example, Magic Cap includes a lesson that helps the user make a telephone call. However, this lesson can't be used until the user has personalized the communicator.
Lesson cards provide support for prerequisites by allowing you to specify a list of conditions that are tested when the lesson card appears. If the conditions are met, the lesson button and the lesson field, filled with text from the card's normalText field, appear on the card. If the conditions are not met, the button does not appear on the card, and the lesson field is filled with alternate text.
The following figure shows an example of the telephone call lesson with its condition (the communicator must be personalized) both not met and met:

Condition is not met

Condition is met
You specify the conditions for your lesson by using objects of class Condition. You can have any number of conditions for your lesson. If all conditions are met, the lesson button and normal text are displayed. The lesson card has a conditions field that refers to an object list of conditions.
Magic Cap determines whether the condition is met by calling an operation that returns a boolean value. Each condition includes an operation field and a target field. Magic Cap calls the given operation on the target. Normally, if the operation returns true, the condition is met. For example, in the Phone someone you know lesson pictured above, the lesson's condition calls the operation DeviceHasOwner on the System object, which tests whether the communicator is personalized. If the operation returns true, the condition is met.
For some operations, you'll want to specify that the operation must return false, rather than true, to indicate that the condition is met. You can do this by setting the condition's reverseSense field to true. For example, the Add your name card lesson, which helps the user personalize the communicator, can only be done if the user has not yet personalized. This lesson's condition also calls the operation DeviceHasOwner on the System object. However, for this lesson, the operation must return false to indicate that the condition is met. To specify this, the condition's reverseSense field is set to true.
If the condition is not met, the condition provides text to display in the lesson card's lesson field. This text is specified in the condition's failureText field.
You can use the lesson card's repeatText field to specify text that you want to appear in the lesson field if the conditions are met after the lesson is completed. For most lessons, this text is the following: Tap `repeat lesson' below if you want to review this lesson. Otherwise, tap the right-hand page corner to go on to the next page. This standard text is provided in the indexical iLessonCompleteMainText.
The following steps summarize how conditions are processed by a lesson:
The Phone someone you know lesson card shown above has the following condition:
Instance Condition 479;
   operation: operation_DeviceHasOwner;
			// This operation returns true if
			// communicator is personalized

      target: iSystem;
			// DeviceHasOwner is an operation of
			// class System

 failureText: (Text 511);
			// If the condition is not met, this text
			// goes into the card's LessonField:
			// Before you do this lesson, your communicator
			// must know your name. The lesson on pages
			// 12-13 can help you fill in your name and
			// address.

reverseSense: false;
			// If operation returns true, condition is met
End Instance;
The Add your name card lesson has the following condition:
Instance Condition 255;
			// See comments in previous example

    operation: operation_DeviceHasOwner;
       target: iSystem;
  failureText: (Text 249);
			// The text object contains the following:
			// Your communicator has your name card now.
			// Tap the right-hand page corner to continue.

 reverseSense: true;
			// If operation returns false, communicator
			// is not personalized, and condition is met

End Instance;
Class LessonStep provides operations you can override with Magic Scripts to customize the step's behavior. You can create a script for operation BeforeAction to perform some function when the step is about to start but before the lesson window is displayed on the screen. You can write a script for Action if you want to customize the step's behavior when the lesson window is on the screen and the tool is set to iLessonTool. When the step is finished and the next step is about to be shown, Magic Cap calls AfterAction. You can create a script for AfterAction to perform some function after the step is done.
Because lesson steps are not viewables, you can't use the tinker tool to open their tinker windows or script windows. Instead, you can use the Inspector in Magic Cap Simulator to open the script window. To do this, open the Inspector and inspect the lesson button. Click on the lessonStep field to see a list of all lesson steps, then click on the one you want to script. With the Inspector displaying the desired lesson step, hold down the Macintosh option key and tap the o in the Inspector's title bar to see the script window for the lesson step.
You can also override these operations by creating a subclass of LessonStep.
For more information, see these topics in Magic Cap Class and Method Reference:
class LessonButton
fields:
leapTo
lesson
class LessonStep
operations and attributes:
Action
AfterAction
BeforeAction
fields:
stepBalloonDot
stepFlags
stepTarget
stepTargetBox
stepText
stepWindowDot
class LessonStepList
operations and attributes:
Completed
fields:
lessonScene
class LessonCard
fields:
conditions
lessonButton
lessonField
normalText
repeatName
repeatText
class Condition
fields:
failureText
operation
reverseSense
target
indexicals:
iLessonCompleteMainText
iLessonTool
Book Contents Previous Chapter Next Chapter